
Studio の準備とスキーマタイプ
前回の前提条件のところで Wordpress に関する環境のチェックが終わっていれば、早速作業に入りましょう。今回は、CMS の環境となる Studio の作成と、コンテンツスキーマの準備になります。
プロジェクトの作成
まず最初に Sanity のプロジェクトの作成を進めます。コマンドラインで以下のコマンドを実行してください。
npm create sanity@latest -- --template clean --create-project "Sanity WordPress" --dataset production --typescript --output-path sanity-wordpress今回の環境はすでに Sanity のアカウントと紐づいているため、Organization に関する質問が表示されます。
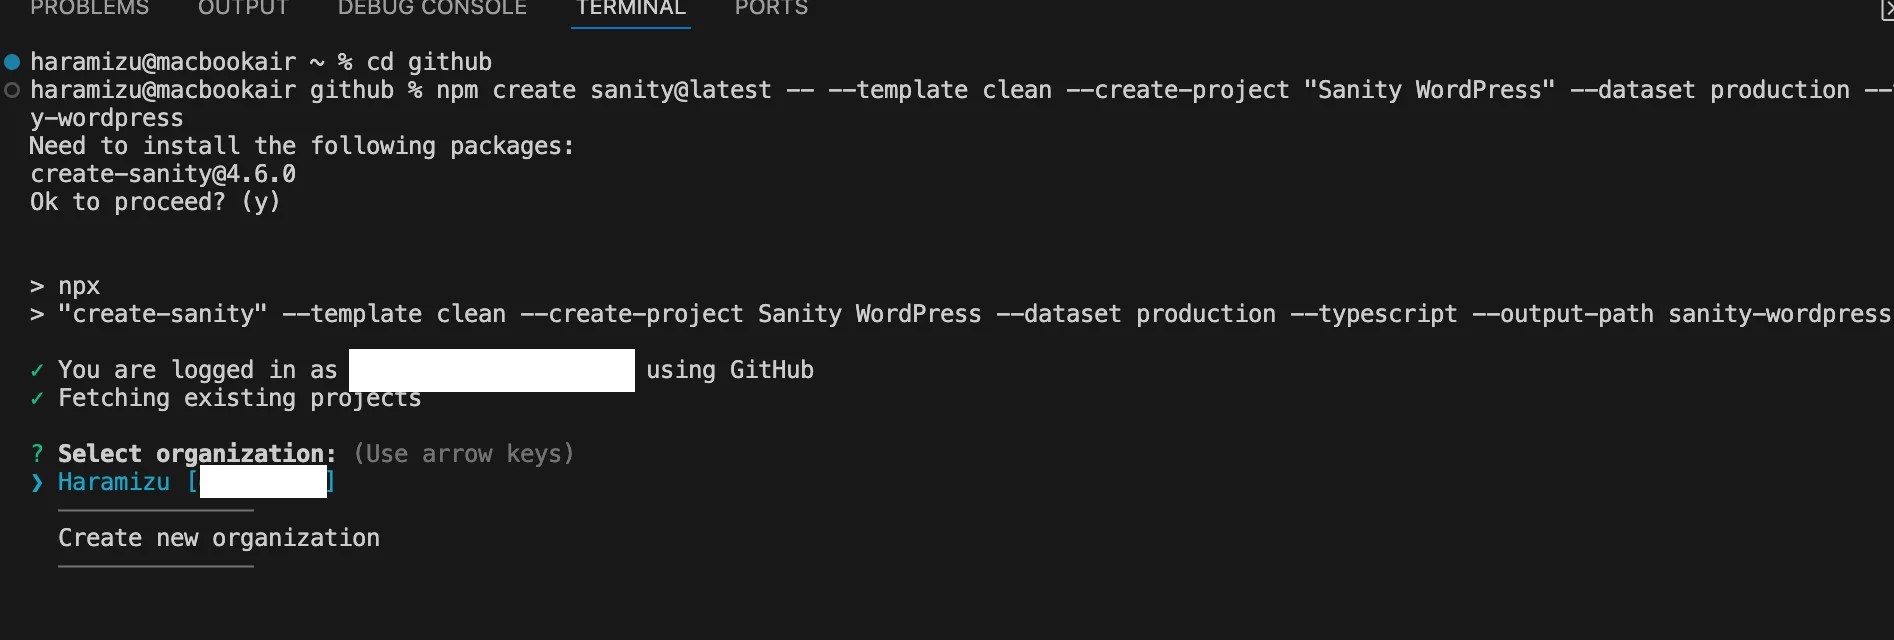
しばらくすると新しい環境が作成されて、Sanity の管理画面からもアクセスできるようになります。

環境ファイルを追加する
作成されたプロジェクトには Sanity の Project ID などが埋め込まれている状態です。個人やチームで作業をする分には不要の手続きとなりますが、今回はサンプルのコードを公開する形にしたいため、以下のように変更をしていきます。
まず、以下のように .env ファイルを作成します。
SANITY_STUDIO_PROJECT_ID=your_project_id
SANITY_STUDIO_DATASET=production
続いて、上記の値を利用しているファイルを2つ変更します。
import {defineCliConfig} from 'sanity/cli'

export default defineCliConfig({
  api: {
    projectId: process.env.SANITY_STUDIO_PROJECT_ID || 'project_id',
    dataset: process.env.SANITY_STUDIO_DATASET || 'production',
  },
  /**
   * Enable auto-updates for studios.
   * Learn more at https://www.sanity.io/docs/cli#auto-updates
   */
  autoUpdates: true,
})// Load environment variables only in Node.js environment
if (typeof window === 'undefined') {
require('dotenv').config()
}
import {defineConfig} from 'sanity'
import {structureTool} from 'sanity/structure'
import {visionTool} from '@sanity/vision'
import {schemaTypes} from './schemaTypes'
export default defineConfig({
name: 'default',
title: 'Sanity WordPress',
projectId: process.env.SANITY_STUDIO_PROJECT_ID || 'project_id',
dataset: process.env.SANITY_STUDIO_DATASET || 'production',
plugins: [structureTool(), visionTool()],
schema: {
types: schemaTypes,
},
})
これで環境変数として Project ID を管理することができるようになりました。
スキーマタイプの追加
Wordpress のコンテンツを保存するためのコンテンツスキーマの定義を追加していきます。今回は4つのスキーマタイプを追加します。
コンテンツのスキーマを追加
まずはページに関するコンテンツのスキーマを追加します。
import {DocumentIcon} from '@sanity/icons'
import {defineField, defineType} from 'sanity'

export const pageType = defineType({
  name: 'page',
  title: 'Page',
  type: 'document',
  icon: DocumentIcon,
  fields: [
    defineField({name: 'title', type: 'string'}),
    defineField({name: 'slug', type: 'slug'}),
    defineField({name: 'date', type: 'datetime'}),
    defineField({name: 'modified', type: 'datetime'}),
    defineField({
      name: 'status',
      type: 'string',
      options: {
        list: [
          {title: 'Published', value: 'publish'},
          {title: 'Future', value: 'future'},
          {title: 'Draft', value: 'draft'},
          {title: 'Pending', value: 'pending'},
          {title: 'Private', value: 'private'},
          {title: 'Trash', value: 'trash'},
          {title: 'Auto-Draft', value: 'auto-draft'},
          {title: 'Inherit', value: 'inherit'},
        ],
      },
    }),
    defineField({
      name: 'content',
      type: 'portableText',
    }),
    defineField({
      name: 'excerpt',
      type: 'portableText',
    }),
    defineField({name: 'featuredMedia', type: 'image'}),
    defineField({
      name: 'author',
      type: 'reference',
      to: [{type: 'author'}],
    }),
  ],
  preview: {
    select: {
      title: 'title',
      subtitle: 'author.name',
      media: 'featuredMedia',
    },
  },
})
続いてブログの投稿のためのスキーマを追加します。
import {ComposeIcon} from '@sanity/icons'
import {defineField, defineType} from 'sanity'

export const postType = defineType({
  name: 'post',
  title: 'Post',
  type: 'document',
  icon: ComposeIcon,
  fields: [
    defineField({name: 'title', type: 'string'}),
    defineField({name: 'slug', type: 'slug'}),
    defineField({name: 'date', type: 'datetime'}),
    defineField({name: 'modified', type: 'datetime'}),
    defineField({
      name: 'status',
      type: 'string',
      options: {
        list: [
          {title: 'Published', value: 'publish'},
          {title: 'Future', value: 'future'},
          {title: 'Draft', value: 'draft'},
          {title: 'Pending', value: 'pending'},
          {title: 'Private', value: 'private'},
          {title: 'Trash', value: 'trash'},
          {title: 'Auto-Draft', value: 'auto-draft'},
          {title: 'Inherit', value: 'inherit'},
        ],
      },
    }),
    defineField({
      name: 'content',
      type: 'portableText',
    }),
    defineField({
      name: 'excerpt',
      type: 'portableText',
    }),
    defineField({name: 'featuredMedia', type: 'image'}),
    defineField({name: 'sticky', type: 'boolean'}),
    defineField({
      name: 'author',
      type: 'reference',
      to: [{type: 'author'}],
    }),
    defineField({
      name: 'categories',
      type: 'array',
      of: [{type: 'reference', to: [{type: 'category'}]}],
    }),
    defineField({
      name: 'tags',
      type: 'array',
      of: [{type: 'reference', to: [{type: 'tag'}]}],
    }),
  ],
  preview: {
    select: {
      title: 'title',
      subtitle: 'author.name',
      media: 'featuredMedia',
    },
  },
})
タグのスキーマを追加します。
import {TagIcon} from '@sanity/icons'
import {defineField, defineType} from 'sanity'

export const tagType = defineType({
  name: 'tag',
  title: 'Tag',
  type: 'document',
  icon: TagIcon,
  fields: [defineField({name: 'name', type: 'string'}), defineField({name: 'slug', type: 'slug'})],
  preview: {
    select: {
      title: 'name',
      subtitle: 'slug.current',
    },
  },
})
カテゴリのスキーマを追加します。
import {FilterIcon} from '@sanity/icons'
import {defineField, defineType} from 'sanity'

export const categoryType = defineType({
  name: 'category',
  title: 'Category',
  type: 'document',
  icon: FilterIcon,
  fields: [
    defineField({name: 'name', type: 'string'}),
    defineField({name: 'slug', type: 'slug'}),
  ],
  preview: {
    select: {
      title: 'name',
      subtitle: 'slug.current',
    },
  },
})
編集者のスキーマを追加します。
import {UserIcon} from '@sanity/icons'
import {defineField, defineType} from 'sanity'

export const authorType = defineType({
  name: 'author',
  title: 'Author',
  type: 'document',
  icon: UserIcon,
  fields: [
    defineField({name: 'name', type: 'string'}),
    defineField({name: 'slug', type: 'slug'}),
    defineField({name: 'url', title: 'URL', type: 'url'}),
    defineField({name: 'description', type: 'text'}),
    defineField({name: 'avatar', type: 'image'}),
  ],
  preview: {
    select: {
      title: 'name',
      subtitle: 'url',
      media: 'avatar',
    },
  },
})
これで Wordpress から取得するデータを格納するためのスキーマを一通り追加することができました。
スキーマのカスタマイズ
Wordpress で管理しているリッチテキストのコンテンツの部分を Sanity では Portable Text の形で管理をする形となります。扱うデータに関するカスタマイズを追加します。
import {defineField} from 'sanity'

export const portableTextType = defineField({
  name: 'portableText',
  type: 'array',
  of: [{type: 'block'}, {type: 'image'}, {type: 'externalImage'}],
})
外部の画像に関する拡張を追加します。
import {defineType} from 'sanity'

export const externalImageType = defineType({
  name: 'externalImage',
  title: 'External Image',
  type: 'object',
  fields: [
    {
      name: 'url',
      title: 'URL',
      type: 'url',
    },
  ],
})
スキーマの拡張は今回はこの2点とします。
アイコンを追加する
公式のコンテンツでは、プロジェクトを作成してすぐにアイコンライブラリを追加しています。実はスキーマの定義で icon の項目があり、ここにさまざまなアイコンを指定することが可能となっています。今回は Sanity が提供するアイコンライブラリを採用して、管理画面での画像などの統一性は維持していきます。
アイコンライブラリの追加は以下の通りです。
npm install @sanity/iconsスキーマを反映する
作成をしたスキーマファイルを置いているだけでは反映されることがないため、./schemaTypes/index.ts のファイルを以下のように更新してください。
import {authorType} from './authorType'
import {categoryType} from './categoryType'
import {externalImageType} from './externalImageType'
import {pageType} from './pageType'
import {postType} from './postType'
import {tagType} from './tagType'
import {portableTextType} from './portableTextType'

export const schemaTypes = [
  authorType,
  categoryType,
  pageType,
  postType,
  tagType,
  externalImageType,
  portableTextType
]
追加したスキーマをこのファイルに反映させることで、変更が有効になります。
起動する
スキーマの拡張などの手続きが完了したところで、以下のコマンドを実行します。
npm run devしばらくすると Sanity の管理画面が表示されます。

この環境に対して、Wordpress のコンテンツの移行を進めて行く形となります。
まとめ
今回は Wordpress から移行するのであればこのデータスキーマで、と言う形でサンプルのまま進めています。実際に移行が完了したあと、自分で作りたい環境にカスタマイズしていくことも可能です。
ここまでのコードは参考までに以下のリポジトリに公開をしています。
このページのステップは公式ページでは以下で公開されています。